뻘소리2018. 1. 4. 14:59

여러/하위 오브젝트 재질

제품 및 버전 포함 

회사 이름: 

Help
제품 내 보기 

다중/하위 오브젝트 재질에서는 형상의 하위 오브젝트 수준에서 서로 다른 재질을 지정할 수 있습니다. 여러 재질을 만들고 오브젝트에 지정한 다음, 메시 선택 수정자를 사용하여 면을 선택하고 여러 재질에서 선택한 면에 지정할 하위 재질을 선택할 수 있습니다.

  • 재질/맵 브라우저 > 재질 > 표준 > 다중/하위 오브젝트

다중/하위 오브젝트 재질을 사용하여 매핑된 그림

오브젝트가 편집 가능 메시 또는 편집 가능한 폴리일 경우 면의 다른 선택 영역으로 재질을 드래그 앤 드롭하고 즉시 다중/하위 오브젝트 재질을 플라이에서 작성할 수 있습니다. 드래그 앤 드롭 하위 오브젝트 재질 지정을 참조하십시오.

메시 편집 수정자를 사용하여 선택한 면으로 드래그하여 새 다중/하위 오브젝트 재질을 만들 수도 있습니다.

하위 재질 ID는 리스트의 순서에 따라 달라지지 않으며 새 ID 값을 입력할 수 있습니다.

재질 편집기의 고유하게 설정 기능을 사용하면 인스턴스화된 하위 재질을 고유한 복사본으로 만들 수 있습니다.

다중/하위 오브젝트 재질 수준에서 샘플 슬롯의 샘플 오브젝트에는 하위 재질의 패치 작업이 표시됩니다. 하위 재질을 편집하면 샘플 슬롯 디스플레이는 재질 편집기 옵션 대화상자의 최상위 수준 아래의 단순 다중 표시 토글 설정에 따라 달라집니다.

다중/하위 오브젝트 재질 사용하기

다음은 메쉬 편집 및 하위 재질 관리와 관련된 몇 가지 사용 팁입니다.

  • 편집 가능한 메시, 폴리, 패치 및 스플라인의 하위 오브젝트 수준이나 메시 편집, 스플라인 또는 패치 수정자가 적용된 오브젝트에서 작업할 때 오브젝트에 다중/하위 오브젝트 재질이 적용되어 있으면 하위 재질 이름별로 검색할 수 있습니다.
  • 오브젝트에 지정되지 않은 하위 재질이나 오브젝트의 표면은 여러 재질 정리 유틸리티를 사용하여 다중/하위 오브젝트 재질에서 '지울' 수 있습니다.
  • 재질에 지정된 중복된 맵은 인스턴스 중복 맵 유틸리티를 사용하여 인스턴스로 변경할 수 있습니다.

절차

다중/하위 오브젝트 재질을 만들려면 다음 중 하나를 수행합니다.

  • 슬레이트 재질 편집기  브라우저 패널  재질  표준 그룹에서 다중/하위 오브젝트 재질을 활성 뷰로 드래그합니다.
  • 컴팩트 재질 편집기에서 샘플 슬롯을 활성화하고 유형 버튼을 클릭한 다음 재질/맵 브라우저에서 다중/하위 오브젝트를 선택하고 확인을 클릭합니다.

    3ds Max에 맵 바꾸기 대화상자가 열립니다. 이 대화상자에는 샘플 슬롯의 원래 재질을 버릴지, 하위 재질로 유지할지를 묻는 메시지가 표시됩니다.

다중/하위 오브젝트 재질 제어는 기본적으로 해당 재질에 포함된 하위 재질 리스트입니다.

하위 재질을 할당하려면 다음 중 하나를 수행합니다.

  • 다중/하위 오브젝트 기본 매개변수 롤아웃에서 하위 재질 버튼을 클릭합니다.

    하위 재질의 매개변수가 표시됩니다. 기본적으로 하위 재질은 블린 음영이 있는 표준 재질입니다.

  • 슬레이트 재질 편집기에서 기본 하위 재질이 활성 뷰의 노드로 나타납니다. 이 노드를 두 번 클릭하여 재질 매개변수를 확인하고 조정할 수 있습니다. 또는 표준 재질 노드를 다른 유형의 노드로 바꿀 수 있습니다.

하위 재질 중 하나를 솔리드 색상으로 만들려면

  • 다중/하위 오브젝트 기본 매개변수 롤아웃에서 하위 재질 버튼 옆에 있는 색상 견본을 클릭합니다.

    색상 선택기에서 색상을 선택합니다.

    하위 재질에 대한 색상 견본은 단축키입니다. 이 견본은 선택한 색상을 하위 재질의 분산 구성요소에 지정합니다.

하위 재질 중 하나를 하위 오브젝트 선택에 지정하려면

  1. 오브젝트를 선택하고 다중/하위 오브젝트 재질을 지정합니다.
  2.  수정 패널에서 오브젝트에 메시 선택을 적용합니다.
  3. 하위 오브젝트를 클릭하고 하위 오브젝트 범주로 면을 선택합니다.
  4. 하위 재질을 지정할 면을 선택합니다.
  5. 재질 수정자를 적용하고 지정하려는 하위 재질의 번호로 재질 ID 값을 설정합니다.

    뷰포트가 업데이트되어 선택한 면에 지정된 하위 재질을 표시합니다.

    다중/하위 오브젝트 재질의 재질 ID 값과 면 선택 롤아웃의 재질 ID 번호는 서로 대응합니다. 다중/하위 오브젝트 재질에 포함된 재질에 해당되지 않는 숫자로 ID를 설정하면 면이 검은색으로 렌더링됩니다.

경고: 일부 형상 원형에서는 기본 재질 ID로 1을 사용하지 않으며 헤드라나 상자와 같은 일부 형상 원형에는 기본적으로 다중 재질 ID가 있습니다.
팁: 메시 편집 수정자를 사용하여 포함된 재질을 선택한 면에 지정할 수도 있습니다. 오브젝트에 메시 편집을 적용하고 면 하위 오브젝트 수준으로 이동한 다음 지정할 면을 선택합니다. 그런 다음 표면 편집 롤아웃에서 재질 ID 값을 하위 재질의 ID로 설정합니다. 편집 가능 메쉬 오브젝트와 마찬가지로 메시 편집 수정자로 다중/하위 오브젝트 재질을 드래그 앤 드롭할 수 있습니다.

새 하위 재질을 추가하려면

  • 추가를 클릭합니다.

    새 하위 재질이 리스트의 끝에 추가됩니다. 기본적으로 새 하위 재질의 ID 번호는 이미 사용 중인 가장 높은 재질 ID보다 1이 더 큽니다.

하위 재질을 제거하려면

  1. 다중/하위 오브젝트 기본 매개변수 롤아웃에서 작은 샘플 구형을 클릭하여 하위 재질을 선택합니다.

    작은 샘플 구형은 검은색과 흰색 테두리로 둘러싸여 하위 재질이 선택되었음을 보여 줍니다.

    하위 재질 리스트가 롤아웃보다 길면 오른쪽에 있는 스크롤 바를 사용하여 리스트의 다른 부분을 표시할 수 있습니다.

  2. 삭제를 클릭합니다.

    하위 재질이 제거됩니다.

    하위 재질 삭제는 실행 취소할 수 없는 작업입니다.

인터페이스

개수
이 필드에는 다중/하위 오브젝트 재질에 포함된 하위 재질 수가 표시됩니다.
수 설정
재질을 구성하는 하위 재질 수를 설정합니다. 다중/하위 오브젝트 재질 수준에서 샘플 슬롯의 샘플 오브젝트에는 하위 재질의 패치 작업이 표시됩니다. 하위 재질을 편집하면 샘플 슬롯 디스플레이는 재질 편집기 옵션 대화상자의 최상위 수준 아래의 단순 다중 표시 토글 설정에 따라 달라집니다.

하위 재질 수를 줄이면 리스트의 끝에서 하위 재질이 제거됩니다. 재질을 삭제하는 데 사용된 경우 수 설정을 실행 취소할 수 있습니다.

추가
리스트에 새 하위 재질을 추가하려면 클릭합니다. 기본적으로 새 하위 재질의 ID 번호는 이미 사용 중인 가장 높은 재질 ID보다 1이 더 큽니다.
삭제
리스트에서 현재 선택된 하위 재질을 삭제하려면 클릭합니다. 하위 재질 삭제는 실행 취소할 수 없습니다.

[정렬 리스트 컨트롤]

다음 버튼은 하위 재질 리스트의 세 열 위에 나타납니다.

ID
재질 ID가 가장 낮은 하위 재질에서 시작하여 재질 ID가 가장 높은 하위 재질에서 끝나도록 리스트를 정렬하려면 클릭합니다.
이름
이름 열에 입력한 이름순으로 리스트를 정렬하려면 클릭합니다.
하위 재질
하위 재질 버튼에 나타나는 하위 재질 이름순으로 리스트를 정렬하려면 클릭합니다.

[하위 재질 리스트]

각 하위 재질의 이 리스트에는 단일 항목이 있습니다. 롤아웃에는 한 번에 최대 10개의 하위 재질이 표시됩니다. 다중/하위 오브젝트 재질에 10개가 넘는 하위 재질이 포함되어 있으면 오른쪽에 있는 스크롤 바를 사용하여 리스트를 스크롤할 수 있습니다.

리스트의 각 하위 재질에는 다음과 같은 제어가 있습니다.

작은 샘플 구
작은 샘플 구는 하위 재질의 "미니 미리 보기"입니다. 이 하위 재질을 선택하려면 클릭합니다. 하위 재질을 삭제하려면 먼저 선택해야 합니다.
ID
이 하위 재질에 지정된 ID 번호를 보여 줍니다. 이 필드를 편집하여 ID 번호를 변경할 수 있습니다. 두 개의 하위 재질에 동일한 ID를 지정하면 롤아웃의 맨 위에 경고 메시지가 나타납니다.

다중/하위 오브젝트 재질을 오브젝트에 적용하면 동일한 재질 ID 번호가 지정된 오브젝트의 면에서 이 하위 재질을 렌더링합니다.

ID로 정렬을 클릭하면 이 값에 따라 가장 낮은 값에서 가장 높은 값순으로 하위 재질 리스트를 정렬할 수 있습니다.

주: 하위 재질 버튼에 재질 번호가 표시되는 경우도 있습니다. 이 번호는 하위 재질 ID가 아닙니다.
이름
재질에 대해 사용자 정의 이름을 입력할 수 있습니다. 하위 재질 수준에 있는 경우에는 하위 재질 이름이 이름 필드에 나타나며, 브라우저와 탐색기에도 나타납니다.
하위 재질 버튼
하위 재질 버튼을 클릭하여 하위 재질 중 하나를 만들거나 편집합니다. 각 하위 재질은 그 자체로 완전한 재질이며 필요한 만큼 많은 과 수준이 있습니다.

기본적으로 각 하위 재질은 블린 음영 처리가 있는 표준 재질입니다.

색상 견본
하위 재질 버튼의 오른쪽에 있는 색상 견본을 클릭하여 색상 선택기를 표시하고 하위 재질의 분산 색상을 선택합니다.
설정/해제 토글
하위 재질을 설정하거나 끕니다. 하위 재질이 꺼져 있으면 샘플 슬롯과 장면의 오브젝트에 검은색으로 나타납니다. 기본적으로 설정되어 있습니다.


'뻘소리' 카테고리의 다른 글

Loop Unrolling  (0) 2018.01.15
로컬라이징 할때 소스 및 리소스 리비전 관리를 어떻게 할거냐..  (2) 2018.01.12
플로킹  (0) 2018.01.02
TLS  (0) 2017.12.28
한글 인코딩 관련 좋은 내용  (0) 2017.12.28
Posted by 멜데스
뻘소리2018. 1. 2. 18:45

Flocking (behavior)

From Wikipedia, the free encyclopedia
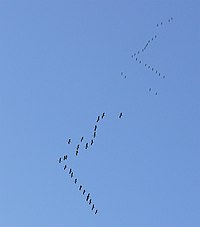
Two flocks of common cranes
A swarm-like flock of starlings

Flocking behavior is the behavior exhibited when a group of birds, called a flock, are foraging or in flight. There are parallels with the shoaling behavior of fish, the swarming behavior of insects, and herd behavior of land animals.

Computer simulations and mathematical models which have been developed to emulate the flocking behaviors of birds can generally be applied also to the "flocking" behavior of other species. As a result, the term "flocking" is sometimes applied, in computer science, to species other than birds.

This article is about the modelling of flocking behavior. From the perspective of the mathematical modeller, "flocking" is the collective motion of a large number of self-propelled entities and is a collective animal behavior exhibited by many living beings such as birdsfishbacteria, and insects.[1] It is considered an emergent behavior arising from simple rules that are followed by individuals and does not involve any central coordination.

Flocking behavior was first[citation needed] simulated on a computer in 1987 by Craig Reynolds with his simulation program, Boids.[2] This program simulates simple agents (boids) that are allowed to move according to a set of basic rules. The result is akin to a flock of birds, a school of fish, or a swarm of insects.

Flocking rules[edit]

Basic models of flocking behavior are controlled by three simple rules:

  1. Separation - avoid crowding neighbors (short range repulsion)
  2. Alignment - steer towards average heading of neighbors
  3. Cohesion - steer towards average position of neighbors (long range attraction)

With these three simple rules, the flock moves in an extremely realistic way, creating complex motion and interaction that would be extremely hard to create otherwise.

The basic model has been extended in several different ways since Reynolds proposed it. For instance, Delgado-Mata et al. [3] extended the basic model to incorporate the effects of fear. Olfaction was used to transmit emotion between animals, through pheromones modelled as particles in a free expansion gas. Hartman and Benes [4] introduced a complementary force to the alignment that they call the change of leadership. This steer defines the chance of the bird to become a leader and try to escape. Hemelrijk and Hildenbrandt [5] used attraction, alignment and avoidance and extended this with a number of traits of real starlings: first, birds fly according to fixed wing aerodynamics, while rolling when turning (thus losing lift); second, they coordinate with a limited number of interaction neighbours of 7 (like real starlings); third, they try to stay above a sleeping site (like starlings do at dawn), and when they happen to move outwards from the sleeping site, they return to it by turning; fourth, they move at relative fixed speed. The authors showed that the specifics of flying behaviour as well as large flocksize and low number of interaction partners were essential to the creation of the variable shape of flocks of starlings.

Measurement[edit]

Measurements of bird flocking have been made[6] using high-speed cameras, and a computer analysis has been made to test the simple rules of flocking mentioned above. It is found that they generally hold true in the case of bird flocking, but the long range attraction rule (cohesion) applies to the nearest 5-10 neighbors of the flocking bird and is independent of the distance of these neighbors from the bird. In addition, there is an anisotropywith regard to this cohesive tendency, with more cohesion being exhibited towards neighbors to the sides of the bird, rather than in front or behind. This is no doubt due to the field of vision of the flying bird being directed to the sides rather than directly forward or backward.

Another recent study is based on an analysis of high speed camera footage of flocks above Rome, and uses a computer model assuming minimal behavioural rules.[7][8][9][10]

Algorithmic complexity[edit]

In flocking simulations, there is no central control; each bird behaves autonomously. In other words, each bird has to decide for itself which flocks to consider as its environment. Usually environment is defined as a circle (2D) or sphere (3D) with a certain radius (representing reach).

A basic implementation of a flocking algorithm has complexity  - each bird searches through all other birds to find those which fall into its environment.

Possible improvements:-

  • bin-lattice spatial subdivision. Entire area the flock can move in is divided into a large number of bins. Each bin stores which birds it contains. Each time a bird moves from one bin to another, lattice has to be updated.
    • Example: 2D(3D) grid in a 2D(3D) flocking simulation.
    • Complexity: , k is number of surrounding bins to consider; just when bird's bin is found in 

Lee Spector, Jon Klein, Chris Perry and Mark Feinstein studied the emergence of collective behavior in evolutionary computation systems.[11]

Bernard Chazelle proved that under the assumption that each bird adjusts its velocity and position to the other birds within a fixed radius, the time it takes to converge to a steady state is an iterated exponential of height logarithmic in the number of birds. This means that if the number of birds is large enough, the convergence time will be so great that it might as well be infinite.[12] This result applies only to convergence to a steady state. For example, arrows fired into the air at the edge of a flock will cause the whole flock to react more rapidly than can be explained by interactions with neighbors, which are slowed down by the time delay in the bird's central nervous systems—bird-to-bird-to-bird.

Applications[edit]

Flock-like behavior in humans may occur when people are drawn to a common focal point or when repelled, as below: a crowd fleeing from the sound of gunfire.

In Cologne, Germany, two biologists from the University of Leeds demonstrated a flock-like behavior in humans. The group of people exhibited a very similar behavioral pattern to that of a flock, where if 5% of the flock would change direction the others would follow suit. When one person was designated as a predator and everyone else was to avoid him, the flock behaved very much like a school of fish.[13]

Flocking has also been considered as a means of controlling the behavior of Unmanned Air Vehicles (UAVs).

Flocking is a common technology in screensavers, and has found its use in animation. Flocking has been used in many films[14] to generate crowds which move more realistically. Tim Burton's Batman Returns (1992) featured flocking bats, and Disney's The Lion King (1994) included a wildebeest stampede.

Flocking behaviour has been used for other interesting applications. It has been applied to automatically program Internet multi-channel radio stations [15] . It has also been used for visualizing information [16] and for optimization tasks [17]


Posted by 멜데스
뻘소리2017. 12. 28. 18:35

TLS

Thread Local Storage (TLS)

Visual Studio 2015
 

The new home for Visual Studio documentation is Visual Studio 2017 Documentation on docs.microsoft.com.

Thread Local Storage (TLS) is the method by which each thread in a given multithreaded process can allocate locations in which to store thread-specific data. Dynamically bound (run-time) thread-specific data is supported by way of the TLS API (TlsAllocTlsGetValueTlsSetValue, and TlsFree). For more information about how thread local storage is implemented on Windows, see Thread Local Storage (Windows). Win32 and the Visual C++ compiler now support statically bound (load-time) per-thread data in addition to the existing API implementation.

C++11: The thread_local storage class specifier is the recommended way to specify thread-local storage for objects and class members. For more information, see Storage classes (C++).

Visual C++ also provides a Microsoft-specific attribute, thread, as extended storage class modifier. Use the __declspec keyword to declare a thread variable. For example, the following code declares an integer thread local variable and initializes it with a value:

__declspec( thread ) int tls_i = 1;  

The following guidelines must be observed when declaring statically bound thread local objects and variables. These guidelines apply both to threadand for the most part also to thread_local:

  • The thread attribute can be applied only to class and data declarations and definitions. It cannot be used on function declarations or definitions. For example, the following code generates a compiler error:

    __declspec( thread )void func();     // This will generate an error.  
    
    
  • The thread modifier might be specified only on data items with static extent. This includes global data objects (both static and extern), local static objects, and static data members of C++ classes. Automatic data objects cannot be declared with the thread attribute. The following code generates compiler errors:

    void func1()  
    {  
        __declspec( thread )int tls_i;            // This will generate an error.  
    }  
    
    int func2(__declspec( thread )int tls_i )    // This will generate an error.  
    {  
        return tls_i;  
    }  
    
    
  • The declarations and the definition of a thread local object must all specify the thread attribute. For example, the following code generates an error:

    #define Thread  __declspec( thread )  
    extern int tls_i;        // This will generate an error, since the  
    int __declspec( thread )tls_i;        // declaration and definition differ.  
    
    
  • The thread attribute cannot be used as a type modifier. For example, the following code generates a compiler error:

    char __declspec( thread ) *ch;        // Error  
    
    
  • Because the declaration of C++ objects that use the thread attribute is permitted, the following two examples are semantically equivalent:

    __declspec( thread ) class B  
    {  
    // Code  
    } BObject;  // OK--BObject is declared thread local.  
    
    class B  
    {  
    // Code  
    };  
    __declspec( thread ) B BObject;  // OK--BObject is declared thread local.  
    
    
  • The address of a thread local object is not considered constant, and any expression involving such an address is not considered a constant expression. In standard C, the effect of this is to forbid the use of the address of a thread local variable as an initializer for an object or pointer. For example, the following code is flagged as an error by the C compiler:

    __declspec( thread )int tls_i;  
    int *p = &tls_i;       //This will generate an error in C.  


    This restriction does not apply in C++. Because C++ allows for dynamic initialization of all objects, you can initialize an object by using an expression that uses the address of a thread local variable. This is accomplished just like the construction of thread local objects. For example, the code shown earlier does not generate an error when it is compiled as a C++ source file. Note that the address of a thread local variable is valid only as long as the thread in which the address was taken still exists.

  • Standard C allows for the initialization of an object or variable with an expression involving a reference to itself, but only for objects of nonstatic extent. Although C++ generally allows for such dynamic initialization of objects with an expression involving a reference to itself, this kind of initialization is not permitted with thread local objects. For example:

    __declspec( thread )int tls_i = tls_i;                // Error in C and C++   
    int j = j;                               // OK in C++, error in C  
    __declspec( thread )int tls_i = sizeof( tls_i )       // Legal in C and C++  


    Note that a sizeof expression that includes the object being initialized does not represent a reference to itself and is enabled in both C and C++.

    C++ does not allow such dynamic initialization of thread data because of possible future enhancements to the thread local storage facility.

  • On Windows operating systems before Windows Vista, __declspec( thread ) has some limitations. If a DLL declares any data or object as __declspec( thread ), it can cause a protection fault if dynamically loaded. After the DLL is loaded with LoadLibrary, it causes system failure whenever the code references the __declspec( thread ) data. Because the global variable space for a thread is allocated at run time, the size of this space is based on a calculation of the requirements of the application plus the requirements of all the DLLs that are statically linked. When you use LoadLibrary, you cannot extend this space to allow for the thread local variables declared with __declspec( thread ). Use the TLS APIs, such as TlsAlloc, in your DLL to allocate TLS if the DLL might be loaded with LoadLibrary.


'뻘소리' 카테고리의 다른 글

Multi/Sub Object Material  (0) 2018.01.04
플로킹  (0) 2018.01.02
한글 인코딩 관련 좋은 내용  (0) 2017.12.28
SAL(Standard Annotation Language)  (0) 2017.12.28
유니스크라이브..  (0) 2017.12.14
Posted by 멜데스
뻘소리2017. 12. 28. 17:23

'뻘소리' 카테고리의 다른 글

플로킹  (0) 2018.01.02
TLS  (0) 2017.12.28
SAL(Standard Annotation Language)  (0) 2017.12.28
유니스크라이브..  (0) 2017.12.14
WinDbg 패키지 파일(웹다운로드X)  (0) 2017.11.23
Posted by 멜데스
뻘소리2017. 12. 28. 11:07

Microsoft 소스 코드 주석 언어 (SAL)는 함수의 매개 변수를 어떻게 사용하는지 완료 될 때 그것들에 대한 가정을 설명하는 주석의 집합을 제공합니다. 주석을 <sal.h>헤더 파일에 정의되었습니다. C++에 대한 Visual Studio 코드 분석을 SAL 주석에 사용하여 기능 분석을 수정합니다. SAL 2.0에 대한 자세한 내용은 Windows 드라이버에 대 한 SAL 2.0 주석을 참조하십시오.

기본적으로, C 및 C++ 개발자가 의도한 불변을 일관되게 표현하는 제한적인 방법으로만 제공합니다. SAL 주석을 사용하여 소비하는 개발자들이 사용하는 방법을 더 잘 이해할 수 있도록 함수를 자세히 설명할 수 있습니다.

간단히 말하면 SAL는 컴파일러가 코드를 검사할 수 있도록 하는 저렴한 방법입니다.

코드의 품질을 높이는 SAL

SAL은 인간이고 코드 분석 도구에 대한 코드 디자인을 보다 이해 하기 쉽게 만들 수 있습니다. C 런타임 함수 memcpy를 보여 수는 이 예제를 고려하십시오.

  
void * memcpy(  
   void *dest,   
   const void *src,   
   size_t count  
);  
  

이 함수는 어떤일을 말할 수 있습니까? 함수를 호출하거나 구현 프로그램이 올바른지 확인하기 위해 특정 속성을 유지 합니다. 예제와 같은 선언을 보고, 정의에 대해서는 모릅니다. SAL 주석없이 코드 주석 또는 문서를 의존해야 합니다. memcpy 에 대한 MSDN 설명서의 말:

"복사본을 dest는 src의 바이트를 계산합니다.원본 영역과 대상 문자열이 겹치면, 동작이 지정되지 않습니다.Memmove은 겹치는 부분을 처리하기 위해 사용합니다.
보안 정보: 는 원본 버퍼보다 크거나 같은 크기의 대상 버퍼인지 확인합니다.자세한 내용은 버퍼 오버런 방지를 참조하십시오."

설명서 2 프로그램이 올바른지 확인하기 위해 특정 속성을 유지하려면 코드에 있는 제안하는 정보 비트를 포함합니다.

  • memcpy복사본은 count 대상 버퍼를 소스 버퍼에서 바이트.

  • 대상 버퍼를 소스 버퍼 이상이여야 합니다.

그러나 컴파일러 설명서나 비공식 메모를 읽을 수 없습니다. 두 개의 버퍼와 count 간의 관계를가 모르고, 효과적으로 관계에 대한 것도 추측할 수 없습니다. SAL는 다음 그림과 같이 속성 및 함수를 구현하는 방법에 대한 자세한 설명을 제공할 수 있습니다.:

  
void * memcpy(  
   _Out_writes_bytes_all_(count) void *dest,   
   _In_reads_bytes_(count) const void *src,   
   size_t count  
);  

이러한 주석이 MSDN 설명서에 있는 정보와 유사하지만 보다 간결하게 하는 의미 있는 패턴을 따르는 것을 주목합니다. 이 코드를 읽을 때 이 함수의 속성 및 버퍼 오버런 보안 문제를 방지하는 방법을 쉽게 파악할 수 있습니다. 게다가 SAL 제공 의미 무늬 효율성과 효과의 잠재적인 버그를 검색하는 초기의 자동화 된 코드 분석 도구를 향상시킬 수 있습니다. 이 버그가 있는 wmemcpy 구현을 쓰는 사람을 가정합니다.

  
wchar_t * wmemcpy(  
   _Out_writes_all_(count) wchar_t *dest,   
   _In_reads_(count) const wchar_t *src,   
   size_t count)  
{  
   size_t i;  
   for (i = 0; i <= count; i++) { // BUG: off-by-one error  
      dest[i] = src[i];  
   }  
   return dest;  
}  
  

이 구현은 일반적인 해제-하나씩 오류가 포함 되어 있습니다. 다행히 코드 작성자 포함 SAL 버퍼 크기 주석-코드 분석 도구만이 함수를 분석하여 버그를 catch할 수 없습니다.

SAL 기본

SAL 네 가지 기본 유형의 사용 패턴으로 분류 되는 매개 변수를 정의 합니다.

범주매개 변수 주석설명
함수 호출에 대한 입력_In_데이터는 호출된 함수에 전달되고 읽기 전용으로 취급됩니다.
호출된 함수에 대한 입력과 호출자에 출력_Inout_사용 가능한 데이터 함수에 전달되고 잠재적으로 수정 됩니다.
호출자에 출력_Out_호출자만 쓰려고 하는 호출된 함수에 대한 공간을 제공 합니다. 호출된 함수는 해당 공간에 데이터를 씁니다.
호출자에 포인터 출력_Outptr_마찬가지로 호출자에 출력. 호출된 함수에서 반환되는 값이 있습니다.

이러한 네 가지 기본 주석을 명시적으로 더 다양한 방법으로 만들 수 있습니다. 기본적으로 주석이 추가된 포인터 매개 변수는 필요한 것으로 간주 됩니다-함수의 성공에 대해 NULL이 아니어야만 합니다. 자주 사용하는 기본 주석 변동을 포인터 매개 변수가 선택적 임을 나타냅니다-NULL이면 함수 작업 과정에서 여전히 성공할 수 있습니다.

이 표에서 필수 및 선택적 매개 변수를 구분하는 방법을 보여 줍니다.

매개 변수가 요구됩니다.선택적 매개 변수입니다.
호출된 함수에 대한 입력_In__In_opt_
호출된 함수에 대한 입력과 호출자에 출력_Inout__Inout_opt_
호출자에 출력_Out__Out_opt_
호출자에 포인터 출력_Outptr__Outptr_opt_

이러한 주석을 사용할 수 있는 초기화되지 않은 값을 확인하고 공식적이고 정확한 방식으로 잘못된 null 포인터를 사용 합니다. 필수 매개 변수에 NULL을 전달하는 것은 충돌이 발생할 수 있나 "실패" 오류 코드 반환이 발생할 수 있습니다. 어느 쪽이건 함수에서의 작업을 계속할 수 없습니다.

이 여기서 기본 SAL 주석 코드 예제를 보여 줍니다.

Visual Studio 코드 분석 도구를 사용하여 오류 찾기

예제에서는 Visual Studio 코드 분석 도구가 코드 오류를 찾기 위해 SAL 주석과 함께 사용 됩니다. 작업을 수행 하는 방법은 다음과 같습니다.

Visual Studio 코드 분석 도구 및 SAL을 사용하려면
  1. Visual Studio SAL 주석을 포함 하는 C++ 프로젝트를 엽니다.

  2. 선택 메뉴 모음에서 빌드를 선택하고, 솔루션에 대해 코드 분석 실행을 합니다.

    이 섹션에 _In_ 예제를 참조 하십시오. 코드 분석을 실행 하는 경우 이 경고가 표시 됩니다.

    C6387 잘못된 매개 변수 값
    '파인트'는 ()'에 '0' 수: 함수 'InCallee'에 대한 사양을 준수하지 않습니다.

예: _In_ 주석

_In_ 주석을 나타냅니다.:

  • 매개 변수가 유효해야 하고 수정되지 않습니다.

  • 함수는 단일 요소 버퍼에서 읽을 것 입니다.

  • 호출자가 버퍼를 제공하고 초기화해야만 합니다.

  • _In_ "읽기 전용"을 지정합니다. _In_ 을 _Inout_ 주석을 대신에 갖고 있어야만 하는 매개변수에 적용하는 것은 흔히 실수하는 것입니다.

  • _In_는 포인터가 아닌 스칼라에 분석기에서 무시하지만 허용 됩니다.

void InCallee(_In_ int *pInt)  
{  
   int i = *pInt;  
}  
  
void GoodInCaller()  
{  
   int *pInt = new int;  
   *pInt = 5;  
  
   InCallee(pInt);  
   delete pInt;     
}  
  
void BadInCaller()  
{  
   int *pInt = NULL;  
   InCallee(pInt); // pInt should not be NULL  
}  
  

이 예제에서 Visual Studio 코드 분석을 사용하는 경우 호출자는 pInt에 대해 초기화된 버퍼에 Null 포인터 전달을 확인합니다. 이 경우 pInt 는 NULL 일 수 없습니다.

예: _In_opt_ 주석

_In_opt_ 는 _In_과 같은, 입력된 매개 변수는 NULL이 될 수 있기 때문에 따라서 함수는 이것을 확인해야 한다는 점이 다릅니다.

  
void GoodInOptCallee(_In_opt_ int *pInt)  
{  
   if(pInt != NULL) {  
      int i = *pInt;  
   }  
}  
  
void BadInOptCallee(_In_opt_ int *pInt)  
{  
   int i = *pInt; // Dereferencing NULL pointer ‘pInt’  
}  
  
void InOptCaller()  
{  
   int *pInt = NULL;  
   GoodInOptCallee(pInt);  
   BadInOptCallee(pInt);  
}  
  

Visual Studio 코드 분석 함수는 버퍼에 액세스하기 전에 NULL에 대해 함수를 확인합니다.

예: _Out_ 주석

_Out_ 는 요소 버퍼를 가리키는 NULL 포인터에 전달되고 함수는 요소를 초기화 하는 일반적인 시나리오를 지원합니다. 호출자가 호출; 하기 전에 버퍼를 초기화 하지 않아도 호출된 함수가 반환하기 전에 초기화하는 데 약속을 합니다.

  
void GoodOutCallee(_Out_ int *pInt)  
{  
   *pInt = 5;  
}  
  
void BadOutCallee(_Out_ int *pInt)  
{  
   // Did not initialize pInt buffer before returning!  
}  
  
void OutCaller()  
{  
   int *pInt = new int;  
   GoodOutCallee(pInt);  
   BadOutCallee(pInt);  
   delete pInt;  
}  
  

Visual Studio 코드 분석 도구는 호출자가 pInt 에 대한 버퍼에 NULL 포인터를 전달 확인하고 반환하기 전에 해당 함수에 의해 버퍼는 초기화됩니다.

예: _Out_opt_ 주석

_Out_opt_ 는 _Out_과 같은, 입력된 매개 변수는 NULL이 될 수 있기 때문에 따라서 함수는 이것을 확인해야 한다는 점이 다릅니다.

  
void GoodOutOptCallee(_Out_opt_ int *pInt)  
{  
   if (pInt != NULL) {  
      *pInt = 5;  
   }  
}  
  
void BadOutOptCallee(_Out_opt_ int *pInt)  
{  
   *pInt = 5; // Dereferencing NULL pointer ‘pInt’  
}  
  
void OutOptCaller()  
{  
   int *pInt = NULL;  
   GoodOutOptCallee(pInt);  
   BadOutOptCallee(pInt);  
}  
  

Visual Studio 코드 분석은 pInt 이 역참조 되기 전에 NULL에 대해 함수를 검사하고 pInt 이 NULL이 아닐 때, 반환하기 전에 함수에 의해 버퍼는 초기화 됩니다.

예: _Inout_ 주석

_Inout_ 는 함수에 의해 변경되는 포인터 매개 변수는 주석을 추가하는 데 사용됩니다. 포인터를 호출하기 전에 유효한 초기화 데이터를 가리켜야 변경될 경우에 여전히 있어야 올바른 값을 반환 합니다. 주석은 함수를 자유롭게 읽고 쓰는 요소가 하나인 버퍼를 지정합니다. 호출자가 버퍼를 제공하고 초기화해야만 합니다.

System_CAPS_ICON_note.jpg 참고

_Out_ 와 마찬가지로, _Inout_ 는 수정할 수 있는 값을 적용해야만 합니다.

  
void InOutCallee(_Inout_ int *pInt)  
{  
   int i = *pInt;  
   *pInt = 6;  
}  
  
void InOutCaller()  
{  
   int *pInt = new int;  
   *pInt = 5;  
   InOutCallee(pInt);  
   delete pInt;  
}  
  
void BadInOutCaller()  
{  
   int *pInt = NULL;  
   InOutCallee(pInt); // ‘pInt’ should not be NULL  
}  
  

Visual Studio 코드 분석은 호출자가 pInt 에 대한 초기화된 버퍼에 non-NULL 포인터를 전달하는 호출자인지 확인하고 반환하기 전에, pInt 은 여전히 non-NULL 이고 버퍼는 초기화 됩니다.

예: _Inout_opt_ 주석

_Inout_opt_ 은 _Inout_ 과 같고, 입력된 매개 변수가 NULL이 되는 것을 허용하는 것을 제외하므로 함수는 이것을 확인해야만 합니다.

  
void GoodInOutOptCallee(_Inout_opt_ int *pInt)  
{  
   if(pInt != NULL) {  
      int i = *pInt;  
      *pInt = 6;  
   }  
}  
  
void BadInOutOptCallee(_Inout_opt_ int *pInt)  
{  
   int i = *pInt; // Dereferencing NULL pointer ‘pInt’  
   *pInt = 6;  
}  
  
void InOutOptCaller()  
{  
   int *pInt = NULL;  
   GoodInOutOptCallee(pInt);  
   BadInOutOptCallee(pInt);  
}  
  

Visual Studio 코드 분석은 pInt 이 NULL이 아닐 때 버퍼에 접근하기 전에 NULL에 대해 확인하는 함수를 검사하고 반환하기 전에 함수에 의해 버퍼는 초기화 됩니다.

예: _Outptr_ 주석

_Outptr_ 은 포인터 반환으로 간주되는 매개 변수에 주석을 지정하는 데 사용됩니다. NULL이 아니어야만 하는 매개 변수이고, 자체 안에 non-NILL 포인터를 반환하는 호출된 된 함수이고 초기화된 데이터에 그 포인터를 가리킵니다.

  
void GoodOutPtrCallee(_Outptr_ int **pInt)  
{  
   int *pInt2 = new int;  
   *pInt2 = 5;  
  
   *pInt = pInt2;  
}  
  
void BadOutPtrCallee(_Outptr_ int **pInt)  
{  
   int *pInt2 = new int;  
   // Did not initialize pInt buffer before returning!  
   *pInt = pInt2;  
}  
  
void OutPtrCaller()  
{  
   int *pInt = NULL;  
   GoodOutPtrCallee(&pInt);  
   BadOutPtrCallee(&pInt);  
}  
  

Visual Studio 코드 분석 도구는 *pInt에 대해 호출자가 non-NULL 포인터를 전달하는 것을 확인하고 이것을 반환하기 전에 함수에 의해 버퍼가 초기화됩니다.

예: _Outptr_opt_ 주석

_Outptr_opt_ 은 _Outptr_ 와 같고 선택적 매개 변수를 제외합니다-호출자는 매개변수에 대해 NULL 포인터에 전달할 수 있습니다.

  
void GoodOutPtrOptCallee(_Outptr_opt_ int **pInt)  
{  
   int *pInt2 = new int;  
   *pInt2 = 6;  
  
   if(pInt != NULL) {  
      *pInt = pInt2;  
   }  
}  
  
void BadOutPtrOptCallee(_Outptr_opt_ int **pInt)  
{  
   int *pInt2 = new int;  
   *pInt2 = 6;  
   *pInt = pInt2; // Dereferencing NULL pointer ‘pInt’  
}  
  
void OutPtrOptCaller()  
{  
   int **ppInt = NULL;  
   GoodOutPtrOptCallee(ppInt);  
   BadOutPtrOptCallee(ppInt);  
}  
  

Visual Studio 코드 분석은 *pInt 이 역참조 되기 전에 NULL에 대해 함수를 검사하고, 반환하기 전에 함수에 의해 버퍼는 초기화 됩니다.

예: _Out_과 _Success_ 주석의 조합

대부분의 개체에 주석은 적용할 수 있습니다. 특히 전체 함수에 주석을 달 수 있습니다. 함수의 가장 큰 특징 중 하나는 성공 또는 실패할 수 있는지입니다. 하지만 연결 버퍼 크기와 같은 C/C++ 함수 성공 또는 실패를 표현할 수 없습니다. _Success_ 주석의 사용에 의해 함수의 성공처럼 보인다고 말할 수 있습니다. _Success_ 주석에 대한 매개 변수는 함수가 성공 했음을 나타낼 때의 식일 뿐입니다. 식 주석이 파서가 처리할 수 있는 모든 것이 될 수 있습니다. 함수가 반환 된 후 주석의 효과 함수가 성공적으로 실행 될 때만 적용 됩니다. 예제가 어떻게 옳은 것을 하는 _Out_ 와 어떻게 _Success_ 상호 작용을 하는지 보여줍니다. return 키워드를 사용 하면 반환 값을 나타냅니다.

  
_Success_(return != false) // Can also be stated as _Success_(return)  
bool GetValue(_Out_ int *pInt, bool flag)  
{  
   if(flag) {  
      *pInt = 5;  
      return true;  
   } else {  
      return false;  
   }  
}  
  

_Out_ 주석은 Visual Studio 코드 분석이 pInt에 대해 버퍼에 non-NULL 포인터를 전달하는 호출자를 확인하고, 그 버퍼는 반환하기 전에 함수에 의해 초기화됩니다.

기존 코드에 주석 추가

SAL은 보안 및 코드의 안정성을 개선하는 데 도움이 되는 강력한 기술입니다. SAL을 학습 한 후 일상 업무에 새로운 스킬을 적용할 수 있습니다. 새 코드에서 SAL 기반 사양을 전체 디자인하여 사용할 수 있고 이전 코드에서 점차적으로 주석을 추가할 수 있으며 업데이트할 때마다 늘려 혜택을 늘릴 수 있습니다.

Microsoft 공용 헤더들은 이미 주석 처리 됩니다. 따라서 프로젝트에 먼저 리프 노드 기능 및 이점을 최대한 활용 하려면 Win32 Api를 호출 하는 함수를 주석을 다는 것이 좋습니다.

주석을 달아야 하는 경우

예를 들면 다음과 같습니다.

  • 모든 포인터 매개 변수에 주석을 지정 합니다.

  • 코드 분석 및 버퍼 포인터 안전을 보장할 수 있도록 주석을 값 범위에 주석을 답니다.

  • 잠금 규칙과 잠금 부작용에 주석을 답니다. 자세한 내용은 잠금 동작에 주석 지정을 참조하십시오.

  • 드라이버 속성 및 기타 도메인 관련 속성에 주석을 답니다.

또는 모든 주석에 투명한 전체를 의도하고 주석을 단 것을 확인 하려면 쉽게 수행할 수 있도록 모든 매개 변수에 주석을 달 수 있습니다.


OS 시리즈가 바뀌면서 보안 쪽도 많이 바뀌었다. 그 중 특히 메모리 관련 보안이 취약하였는데 그 보안 취약점을 해결하고자 문자열 함수_s 가 생겨남.

버퍼 사이즈 인자를 하나 더 받게되는데 이 역시 호출할때 호출자가 버퍼 사이즈를 정확히 알고 사용해야 문제가 없다. 결국 사이즈가 Dest가 Src보다 크면 오버플로우가 일어난다. 

근데 SAL 매크로를 사용하면 메모리 오버런이 일어났을 경우 기존 할당된 버퍼 사이즈 크기, 어떤 값이 들어가서 오버런이 되었는지 Warning으로 띄워준다.

마소에서 제공하는 라이브러리, 개발툴킷, 메모리 디버깅 툴 등 생각보다 SAL 매크로가 많은 곳에서 사용되고 있다. 혼자 뭐 만들때만 유용하게 쓰고있다.

'뻘소리' 카테고리의 다른 글

TLS  (0) 2017.12.28
한글 인코딩 관련 좋은 내용  (0) 2017.12.28
유니스크라이브..  (0) 2017.12.14
WinDbg 패키지 파일(웹다운로드X)  (0) 2017.11.23
이런걸 볼 일이 있을거란 생각은 못했었다.  (0) 2017.11.03
Posted by 멜데스
뻘소리2017. 12. 14. 12:00

usp10.dll로 검색하면 죄다 바이러스 변복조 얘기밖에 없음.


GUI나 폰트관련해서 쓸건데 버퍼 클래스 하나가 필요하다.


다른 함수들은 알아서 만든다.


usp를 쓸때 필요할것 같은게 

SCRIPT_STRING_ANALYSIS    변수    -> 현재 스트링을 분석하기 위한 변수

SCRIPT_LOGATTR   헤더 주석 참조   

HINSTANCE dll 핸들


워드랩 위치 가져올때는 

scriptitemize랑 scriptbreak 활용하면 될듯


'뻘소리' 카테고리의 다른 글

한글 인코딩 관련 좋은 내용  (0) 2017.12.28
SAL(Standard Annotation Language)  (0) 2017.12.28
WinDbg 패키지 파일(웹다운로드X)  (0) 2017.11.23
이런걸 볼 일이 있을거란 생각은 못했었다.  (0) 2017.11.03
SIMD  (0) 2017.11.02
Posted by 멜데스
뻘소리2017. 11. 23. 16:17

덤프 디버깅을 가끔씩 하는데 이놈의 작업 환경도 가끔씩 바뀐다. 사내망, 보안존 같은데서 쓰고 싶은데 웹다운로드가 안되서 그냥 패키지 파일을 올렸다.

잊을만하면 한번씩 그래서 그냥 올려버렸다.


X64_Debuggers_And_Tools-x64_en-us.zip.001
X64_Debuggers_And_Tools-x64_en-us.zip.002

X86_Debuggers_And_Tools-x86_en-us.zip.001

X86_Debuggers_And_Tools-x86_en-us.zip.002

심볼패키지.

https://developer.microsoft.com/en-us/windows/hardware/download-symbols#d


'뻘소리' 카테고리의 다른 글

SAL(Standard Annotation Language)  (0) 2017.12.28
유니스크라이브..  (0) 2017.12.14
이런걸 볼 일이 있을거란 생각은 못했었다.  (0) 2017.11.03
SIMD  (0) 2017.11.02
처음으로 초대장 배포해보네요..(마감)...  (36) 2017.06.07
Posted by 멜데스
뻘소리2017. 11. 3. 19:12

응 볼일은 없을줄 알았다. 근데 생김..

능력자분들이 계셔서 참고할수 있어서 다행이야..

https://msdn.microsoft.com/en-us/library/bb219840(VS.85).aspx

https://www.slideshare.net/Hybrid0/sh-prt-kasastudy

http://www.gpgstudy.com/forum/viewtopic.php?t=2618


조명..쪼명..

//-------------------------------------------------------------------------------------- 
// File: LocalDeformablePRT.fx 
// 
// The effect file for the LocalDeformablePRT sample.   
//  
// Copyright (c) Microsoft Corporation. All rights reserved. 
//-------------------------------------------------------------------------------------- 
 
//-------------------------------------------------------------------------------------- 
// Global variables 
//-------------------------------------------------------------------------------------- 
float    g_fTime;                       // App's time in seconds 
float4x4 g_mViewProjection;             // View * Projection matrix 
float3   g_vLightDirection;             // Directional light 
float    g_fLightIntensity;             // Intensity 
float4   g_vLightCoeffsR[4];            // SH lighting coefficients 
float4   g_vLightCoeffsG[4];            // SH lighting coefficients 
float4   g_vLightCoeffsB[4];            // SH lighting coefficients 
float3   g_vColorTransmit;              // Per-channel transmission ratio 
 
// Matrix Pallette 
int g_NumBones = 1; 
static const int MAX_MATRICES = 26; 
float4x3 g_mWorldMatrixArray[MAX_MATRICES]; 
 
texture Albedo;  
texture NormalMap; 
 
textureCUBE YlmCoeff0; 
textureCUBE YlmCoeff4; 
textureCUBE YlmCoeff8; 
textureCUBE YlmCoeff12; 
 
sampler AlbedoSampler = sampler_state { 
    Texture = (Albedo); 
    MipFilter = LINEAR; 
    MinFilter = LINEAR; 
    MagFilter = LINEAR; 
    ADDRESSU = WRAP; 
    ADDRESSV = WRAP; 
}; 
 
sampler NormalMapSampler = sampler_state { 
    Texture = (NormalMap); 
    MipFilter = NONE; 
    MinFilter = LINEAR; 
    MagFilter = LINEAR; 
    ADDRESSU = WRAP; 
    ADDRESSV = WRAP; 
}; 
 
sampler YlmCoeff0Sampler = sampler_state { 
    Texture = (YlmCoeff0); 
    MipFilter = LINEAR; 
    MinFilter = LINEAR; 
    MagFilter = LINEAR; 
    ADDRESSU = CLAMP; 
    ADDRESSV = CLAMP; 
}; 
 
sampler YlmCoeff4Sampler = sampler_state { 
    Texture = (YlmCoeff4); 
    MipFilter = LINEAR; 
    MinFilter = LINEAR; 
    MagFilter = LINEAR; 
    ADDRESSU = CLAMP; 
    ADDRESSV = CLAMP; 
}; 
 
sampler YlmCoeff8Sampler = sampler_state { 
    Texture = (YlmCoeff8); 
    MipFilter = LINEAR; 
    MinFilter = LINEAR; 
    MagFilter = LINEAR; 
    ADDRESSU = CLAMP; 
    ADDRESSV = CLAMP; 
}; 
 
sampler YlmCoeff12Sampler = sampler_state { 
    Texture = (YlmCoeff12); 
    MipFilter = LINEAR; 
    MinFilter = LINEAR; 
    MagFilter = LINEAR; 
    ADDRESSU = CLAMP; 
    ADDRESSV = CLAMP; 
}; 
 
 
//-------------------------------------------------------------------------------------- 
// The Local Deformable PRT coefficients are a zonal harmonic 
// approximation of a spherical harmonic PRT transfer vector 
// representing the light transport of the scene including 
// self-shadowing, interreflections and subsurface scattering. 
//  
// They are the solution of a least squares optimization w.r.t to a 
// normal vector.  Here we construct a 
// spherical harmonic transfer vector by scaling the spherical 
// harmonics coefficients in the normal direction with these 
// coefficients.   
//-------------------------------------------------------------------------------------- 
void BuildSHTransferVector(float4 vLDPRTCoeffs, float4 vSHCoeffs[4], out float4 vTransferVector[4])  
{ 
    vTransferVector[0] = float4(vLDPRTCoeffs.x, vLDPRTCoeffs.y, vLDPRTCoeffs.y, vLDPRTCoeffs.y)*vSHCoeffs[0]; 
    vTransferVector[1] = float4(vLDPRTCoeffs.z, vLDPRTCoeffs.z, vLDPRTCoeffs.z, vLDPRTCoeffs.z)*vSHCoeffs[1]; 
    vTransferVector[2] = float4(vLDPRTCoeffs.z, vLDPRTCoeffs.w, vLDPRTCoeffs.w, vLDPRTCoeffs.w)*vSHCoeffs[2]; 
    vTransferVector[3] = float4(vLDPRTCoeffs.w, vLDPRTCoeffs.w, vLDPRTCoeffs.w, vLDPRTCoeffs.w)*vSHCoeffs[3]; 
}  
 
 
//-------------------------------------------------------------------------------------- 
// Computes the cubic spherical harmonic (aka Ylm(theta,phi)) coefficients in the 
// direction vSHCoeffDir 
//-------------------------------------------------------------------------------------- 
void Ylm(float3 vSHCoeffDir, out float4 vYlm[4])  
{   
    vYlm[0] = texCUBE(YlmCoeff0Sampler,  vSHCoeffDir); 
    vYlm[1] = texCUBE(YlmCoeff4Sampler,  vSHCoeffDir); 
    vYlm[2] = texCUBE(YlmCoeff8Sampler,  vSHCoeffDir); 
    vYlm[3] = texCUBE(YlmCoeff12Sampler, vSHCoeffDir);   
}  
 
 
//-------------------------------------------------------------------------------------- 
// 1 channel LDPRT, 3 channel lighting  
//-------------------------------------------------------------------------------------- 
float4 LDPRTCoeffLighting(float2 vTexCoord, float3 vSHCoeffDir)  
{ 
    float4 vExitRadiance[3] = { 0, 0, 0, 0, 0, 0, 0, 0, 0, 0, 0, 0 }; 
    float4 vTransferVector[4], vYlm[4]; 
    Ylm(vSHCoeffDir, vYlm); 
 
    // A 4 channel texture can hold a cubics worth of LDPRT coefficients. 
    float4 vLDPRTCoeffs = { 1,  2.0/3.0, 0.25, 0}; 
    BuildSHTransferVector(vLDPRTCoeffs, vYlm, vTransferVector); 
     
    // Calculate sub-surface contribution 
     
    // Negating the odd-order coefficients will mirror the lobe across the tangent plane 
    vLDPRTCoeffs.y *= -1;  
    float4 vTransferVectorBehind[4]; 
    BuildSHTransferVector(vLDPRTCoeffs, vYlm, vTransferVectorBehind); 
     
    // The alpha channel of the albedo texture is being used to store how 'thin' 
    // the material is, where higher values allow more light to transmit. 
    // Although each color channel could have a separate thickness texture, we're 
    // simply scaling the amount of transmitted light by a channel scalar.  
    float4 vAlbedo = tex2D( AlbedoSampler, vTexCoord ); 
    for( int i=0; i < 4; i++ ) 
    { 
        vTransferVectorBehind[i] *= vAlbedo.a; 
    } 
 
    // Red 
    vExitRadiance[0] += g_vLightCoeffsR[0] * (vTransferVector[0] + g_vColorTransmit.r * vTransferVectorBehind[0]); 
    vExitRadiance[0] += g_vLightCoeffsR[1] * (vTransferVector[1] + g_vColorTransmit.r * vTransferVectorBehind[1]); 
    vExitRadiance[0] += g_vLightCoeffsR[2] * (vTransferVector[2] + g_vColorTransmit.r * vTransferVectorBehind[2]); 
    vExitRadiance[0] += g_vLightCoeffsR[3] * (vTransferVector[3] + g_vColorTransmit.r * vTransferVectorBehind[3]); 
 
    // Green 
    vExitRadiance[1] += g_vLightCoeffsG[0] * (vTransferVector[0] + g_vColorTransmit.g * vTransferVectorBehind[0]); 
    vExitRadiance[1] += g_vLightCoeffsG[1] * (vTransferVector[1] + g_vColorTransmit.g * vTransferVectorBehind[1]); 
    vExitRadiance[1] += g_vLightCoeffsG[2] * (vTransferVector[2] + g_vColorTransmit.g * vTransferVectorBehind[2]); 
    vExitRadiance[1] += g_vLightCoeffsG[3] * (vTransferVector[3] + g_vColorTransmit.g * vTransferVectorBehind[3]); 
 
    // Blue 
    vExitRadiance[2] += g_vLightCoeffsB[0] * (vTransferVector[0] + g_vColorTransmit.b * vTransferVectorBehind[0]); 
    vExitRadiance[2] += g_vLightCoeffsB[1] * (vTransferVector[1] + g_vColorTransmit.b * vTransferVectorBehind[1]); 
    vExitRadiance[2] += g_vLightCoeffsB[2] * (vTransferVector[2] + g_vColorTransmit.b * vTransferVectorBehind[2]); 
    vExitRadiance[2] += g_vLightCoeffsB[3] * (vTransferVector[3] + g_vColorTransmit.b * vTransferVectorBehind[3]); 
 
    return float4( dot(vExitRadiance[0], 1),  
                   dot(vExitRadiance[1], 1),  
                   dot(vExitRadiance[2], 1),  
                   1 ); 
}  
 
 
//-------------------------------------------------------------------------------------- 
// Basic vertex transformation 
//-------------------------------------------------------------------------------------- 
struct VS_INPUT { 
    float4 Position     : POSITION; 
    float3 Normal       : NORMAL; 
    float3 Tangent      : TANGENT;  
    float4 BlendWeights : BLENDWEIGHT; 
    float4 BlendIndices : BLENDINDICES; 
    float2 TexCoord     : TEXCOORD0; 
}; 
 
struct VS_OUTPUT  
{ 
    float4 Position   : POSITION; 
    float2 TexCoord   : TEXCOORD0; 
    float3 Normal     : TEXCOORD1; 
    float3 Tangent    : TEXCOORD2; 
    float3 Binormal   : TEXCOORD3; 
}; 
 
VS_OUTPUT VS( VS_INPUT In, uniform int NumBones )  
{ 
    VS_OUTPUT Out; 
    Out.Position = 0; 
    Out.Normal = 0; 
    Out.Tangent = 0; 
     
    // Cast the vectors to arrays for use in the for loop below 
    int IndexArray[4] = (int[4])In.BlendIndices; 
    float BlendWeightsArray[4] = (float[4])In.BlendWeights; 
     
    float LastWeight = 0; 
    for (int iBone = 0; iBone < NumBones-1; iBone++) 
    { 
        Out.Position.xyz += mul( In.Position, g_mWorldMatrixArray[IndexArray[iBone]] ) * BlendWeightsArray[iBone]; 
        Out.Normal += mul( In.Normal, g_mWorldMatrixArray[IndexArray[iBone]] ) * BlendWeightsArray[iBone]; 
        Out.Tangent += mul( In.Tangent, g_mWorldMatrixArray[IndexArray[iBone]] ) * BlendWeightsArray[iBone]; 
         
        LastWeight += BlendWeightsArray[iBone]; 
    } 
    LastWeight = 1.0f - LastWeight;  
     
    // Now that we have the calculated weight, add in the final influence 
    Out.Position.xyz += ( mul( In.Position, g_mWorldMatrixArray[IndexArray[NumBones-1]] ) * LastWeight ); 
    Out.Normal += ( mul( In.Normal, g_mWorldMatrixArray[IndexArray[NumBones-1]] ) * LastWeight );  
    Out.Tangent += ( mul( In.Tangent, g_mWorldMatrixArray[IndexArray[NumBones-1]] ) * LastWeight );  
     
    // Transform the position into screen space 
    Out.Position.w = 1; 
    Out.Position = mul( Out.Position, g_mViewProjection ); 
     
    // Set up the tangent frame in world space 
    Out.Binormal = cross( Out.Normal, Out.Tangent );  
 
    // Pass the texture coordinate 
    Out.TexCoord = In.TexCoord; 
     
    return Out; 
}  
 
 
//-------------------------------------------------------------------------------------- 
// Per-pixel N dot L / local deformable PRT lighting 
//-------------------------------------------------------------------------------------- 
float4 PS( VS_OUTPUT In, uniform bool bNdotL, uniform bool bUnBias ) : COLOR0  
{ 
    // Albedo 
    float4 Color = tex2D( AlbedoSampler, In.TexCoord ); 
   
    // Normal map 
    float3 Normal = tex2D( NormalMapSampler, In.TexCoord ); 
     
    // If using a signed texture, we must unbias the normal map data 
    if(bUnBias) 
        Normal = (Normal * 2) - 1; 
    
    // Move the normal from tangent space to world space 
    float3x3 mTangentFrame = { In.Tangent, In.Binormal, In.Normal }; 
    Normal = mul( Normal, mTangentFrame ); 
     
    if( bNdotL ) 
    { 
        // Basic N dot L lighting 
        Color *= g_fLightIntensity * saturate( dot( Normal, g_vLightDirection ) ); 
    } 
    else 
    { 
        // 1 channel LDPRT, 3 channel lighting loading Ylm coeffs from cubemaps 
        Color *= LDPRTCoeffLighting( In.TexCoord, Normal ); 
    }    
 
    return Color; 
}  
 
                           
//-------------------------------------------------------------------------------------- 
// Techniques 
//-------------------------------------------------------------------------------------- 
technique NdotL 
{ 
    pass p0  
    { 
        VertexShader = compile vs_2_0 VS(g_NumBones); 
        PixelShader  = compile ps_2_0 PS(true,false); 
    } 
} 
 
technique LDPRT 
{ 
    pass p0  
    { 
        VertexShader = compile vs_2_0 VS(g_NumBones); 
        PixelShader  = compile ps_2_0 PS(false,false); 
    } 
} 
 
technique NdotL_Unbias 
{ 
    pass p0  
    { 
        VertexShader = compile vs_2_0 VS(g_NumBones); 
        PixelShader  = compile ps_2_0 PS(true,true); 
    } 
} 
 
technique LDPRT_Unbias 
{ 
    pass p0  
    { 
        VertexShader = compile vs_2_0 VS(g_NumBones); 
        PixelShader  = compile ps_2_0 PS(false,true); 
    } 
} 

https://www.slideshare.net/Hybrid0/sh-prt-kasastudy

http://blog.naver.com/PostView.nhn?blogId=sorkelf&logNo=40158230165

'뻘소리' 카테고리의 다른 글

유니스크라이브..  (0) 2017.12.14
WinDbg 패키지 파일(웹다운로드X)  (0) 2017.11.23
SIMD  (0) 2017.11.02
처음으로 초대장 배포해보네요..(마감)...  (36) 2017.06.07
네비메시에 관해서....  (0) 2016.10.17
Posted by 멜데스
뻘소리2017. 11. 2. 17:22

SIMD

위키백과, 우리 모두의 백과사전.
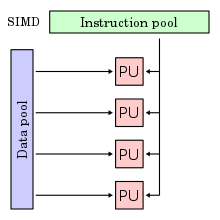
SIMD의 동작 구조. 하나의 명령어와 여러 개의 값을 다룰 수 있다.
플린의 분류학
 단일
명령어
복수
명령어
단일
자료
SISDMISD
복수
자료
SIMDMIMD
v  d  e  h

SIMD(Single Instruction Multiple Data)는 병렬 프로세서의 한 종류로, 하나의 명령어로 여러 개의 값을 동시에 계산하는 방식이다.

벡터 프로세서에서 많이 사용되는 방식으로, 비디오 게임 콘솔이나 그래픽 카드와 같은 멀티미디어 분야에 자주 사용된다. CPU에서는 인텔의 MMX스트리밍 SIMD 확장(SSE)과 AMD의 3D나우! 등의 기술에서 이를 적용했다.

외부 링크[편집]


Posted by 멜데스
뻘소리2017. 6. 7. 18:50

i n v i t a t i o n

티스토리 초대장

+ 남은 초대장 수 : 0

안녕하세요!

티스토리에 보금자리를 마련하시려는 여러분께 초대장을 배포해 드리려고 합니다.

나만의, 내 생각을, 내 기억을 담는 소중한 블로그를 만들고 싶다면 티스토리로 시작해보세요!

티스토리 블로그는 초대에 의해서만 가입이 가능합니다. 원하시는 분은 댓글에 E-mail 주소를 남겨주시면 초대장을 보내드립니다. 남겨주실 때에는 꼭 비밀댓글로 남겨주세요!

초대장을 보내드리고 바로 개설하시지 않으신 분들은 초대장을 회수할 수도 있으니 바로 개설해주세요!

Yes
이런 분들께 드립니다!
1. 다른 블로그를 사용해보셨던 분
2. 이메일 주소가 정상적인 분
3. 블로그를 시작하려는 이유를 남겨주신 분!
No
이런 분들께 드리지 않아요!
1. 이메일 주소가 의심되는 분!
2. 이메일 주소를 남기지 않으신 분
3. 이유도 없이 달라고 하시는 분!
티스토리 이래서 좋아요!
1. 이미지, 동영상, 오디오, 파일까지! 무한 용량과 강력한 멀티미디어를 올릴 수 있어요!
2. 스킨위자드로 스킨을 내맘대로~ 거기에 기능 확장 플러그인까지!
3. 내가 원하는대로 myID.com으로 블로그 주소를 만들 수 있어요!

위 사항만 지켜주시면 그냥 드립니다... 저도 공부하면서 아는 분한테 공부블로그 만드는걸 추천해서 초대장을 받고 시작했는데 받은 만큼 다시 베풀어야 할 것 같네요.

미션받는것도 귀찮고 방문자 수 늘리는것도 의미없고 공부하는 블로그라 그냥 베풀고 싶습니다. 스패머가 아니다 싶으면 그냥 드릴게요.

이메일이랑 개설 이유만 남겨주세요. 악용할 이유만 아니면 드릴테니까요. 배포는 확인하면 그때 드릴게요. 하루에 한 번은 들어가니까요. 15장 소진하면 접을게요.

받는 분 중 특히 IT쪽 공부하는 블로그를 하신다면 저랑 소통할 수 있었으면 좋겠습니다. 이건 개인적인거니까 선택이에요.


그렇지만 1달 안에 개설 안하시면 초대장 회수하겠습니다. 개설하라고 나눠준 의미가 없잖아요.


------------------------------------------------------마감----------------------------------------------------------------------------------

정말 좋은 말씀많이 주시고 공부하시는 분도 꽤나 많아서 단 한 분도 거를수가 없었네요.. 제가 초대장이 좀 더 많았더라면 전부 드렸을텐데 15장 뿐이라 선착순으로 드릴수 밖에 없었습니다. 이 점은 죄송합니다. 혹여나 다음번에 다시 배포할 일이 생기면 그 때 우선적으로 챙겨드리겠습니다...

'뻘소리' 카테고리의 다른 글

이런걸 볼 일이 있을거란 생각은 못했었다.  (0) 2017.11.03
SIMD  (0) 2017.11.02
네비메시에 관해서....  (0) 2016.10.17
휴리스틱함수  (0) 2016.10.15
Coupling에 관해서..  (0) 2016.10.13
Posted by 멜데스